Dock Toolbar

This page provides information on the tools available within the SCIMS environment. When a tool is active, the tool's icon will have an orange light above it. To deactivate that tool, either click the icon again, close the tool pane, or activate another tool.
Zoom to NSW

Left click on Zoom to NSW to change map extent to whole of NSW.
Zoom to Previous Extent

Left clicking on the Zoom to Previous Extent tool will return the map to the previous extent (if available). Subsequent clicks will continue to cycle through previous extents.
Zoom to Next Extent

Left clicking on the Zoom to Next Extent tool will take the map to the next extent (if available). Subsequent clicks will continue to cycle through the next extents.
Show Legend

Selecting this tool will display a legend which defines the icons depicting the survey mark position. Each icon relates to the survey mark type and the accuracy of the spatial data held for each mark within the SCIMS database. Also includes a description of the mark status.

Area Tool

When the tool is activated, the Area Tool pane will display. To move the pane, click + hold the blue title bar and drag the pane.

Left click on the map to start marking the boundary. Clicking again will end the current line segment. Double click to complete the boundary and calculate the area and perimeter of the polygon you have drawn.
To deactivate the tool you can close the tool pane, click the tool icon on the toolbar, or activate another tool.
Distance Tool

When the tool is activated, the Distance Tool pane will display. To move the pane, click + hold the blue title bar and drag the pane.
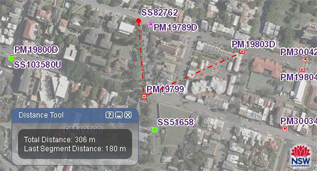
Left click on the map to start measuring. Clicking again will end the current line segment, and the measurement will be displayed in the tool pane.
To finish the measurement, double-click on the map.
To deactivate the tool you can close the tool pane, click the tool icon on the toolbar, or activate another tool.
Coordinate Tool

When the tool is activated, the Coordinate Tool pane will display. To move the pane, click + hold the blue title bar and drag the pane.
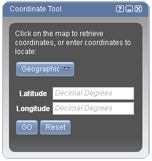
Left click on the map to capture the coordinates for that point, which will display in the coordinate fields.
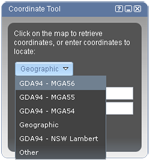
The maps are displayed in a Geographic Coordinate System (GCS). You may change to a projection type using the dropdown button. This will convert the selected point in geographic coordinates into coordinates in your selected projection. This will not re-project the maps into your chosen projection.
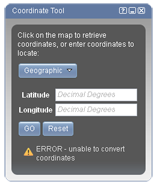
If a valid set of coordinates are contained in the fields, the tool will attempt to convert the coordinates to the selected projection. If the conversion is not successful an error message will be displayed.
To pan/zoom to a location, enter the coordinates in the fields, and click the 'GO' button. The map will move to the point entered. The 'Reset' button will clear the current coordinates.
If you are using a mobile device (i.e. tablet/ iPad), you will have an extra button, 'Current Location'. This will attempt to approximate your location using the device's built in GPS, or network signal.
To deactivate the tool you can close the tool pane, click the tool icon on the toolbar, or activate another tool.
Identify Tool

When the tool is activated, the Identify Tool pane will display. To move the pane, click + hold the blue title bar and drag the pane. Left click on the map to perform an identify operation. A loading message will appear which disappears once all results have been received.

You may choose one of four options when performing an identify operation:
Identify Features by Point

This option is selected by default. Allows for the selection of one point at a time.
Identify Features by Rectangle

Allows for the selection of one or more features at a time using a rectangle as the selection tool. Click and drag a rectangle on the map, all features within that area will be identified.
Identify Features by Polygon

Allows for the selection of one or more features at a time using a polygon as the selection tool. Click a point on the map to start drawing the polygon. Continue clicking to add further points, then double click to complete the polygon. All features within that area will be identified.
Remove Selection Graphic

Click this to button to remove the current selection graphic from the map.
Identify results include Suburb, LGA, Lot, Address, Parish and Imagery. Each set of results is displayed as a separate category in the tool pane. Clicking on an individual result will zoom to its location and highlight the feature.
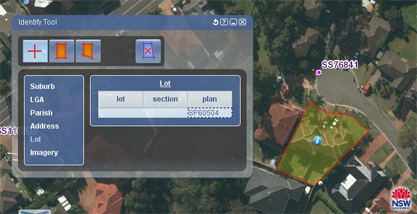
Different results may be available at different scales. For example, Lot results may not be available in some areas at scales beyond 1:144,448. Try zooming in closer before using the identify tool to view these results.
Click the reset icon in the toolbar to clear the current set of results.
To deactivate the tool you can close the tool pane, click the tool icon on the toolbar, or activate another tool.
Print/PDF Tool

The Print/PDF Tool provides the ability to generate a print preview, which you can then print or view/save as a PDF file. Zoom into the area of interest and click the Print/PDF Tool.

When the tool is activated, the Print/PDF pane will display. To move the pane, click + hold the blue title bar and drag the pane.
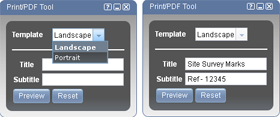
Select a template from the drop down menu. Enter any desired information you would like on your map in the fields available. Click the "Preview" button to generate the print preview. The "Reset" button can be used to clear the text in Title and Subtitle fields.
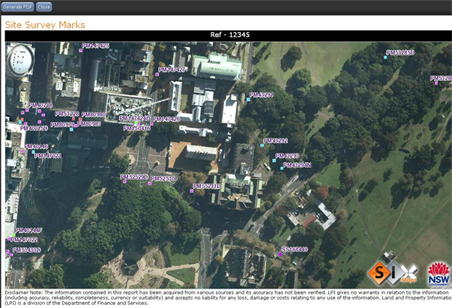
Once the preview has been generated, you may zoom in/out or pan the map to attain your required extent. Click the "Generate PDF" button, which will generate and open a PDF version of your map in a new window. From here you may save or print the PDF file as required.
To return back to the map view, click the "Close" button on the top left corner in the window to return to the SCIMS Online view.
Help

Left clicking on the Help tool will open the Welcome & Help pane. There are four tabs which can be selected to find out more information, the "Welcome", "Help & Tips", "Contact Us/Feedback" and "Contributors" tabs.


